How to transition SMTP Mail Flow Service to office 365 Exchange Online Protection(EOP)
- Radhakrishnan Govindan
- Apr 29, 2016
- 5 min read
In this article, We will see how to transition On-premises SMTP Mail flow Services to Exchange online Protection(EOP) which is cloud based email filtering.
What Exchange Online Protection(EOP):
EOP is Cloud Based email filtering and provides inbound and outbound spam and malware filtering, reporting, message trace, and mail-flow configuration features. EOP replaces Microsoft Forefront Online Protection for Exchange(FOFE)
Why Exchange online Protection:
EOP does three engine scanning for all the mails which enables three tier protection for all the inbound emails to ensure that no malware, spam mails are getting missed out of the scan.
EOP runs on a worldwide network of datacenters that are designed to provide the best availability.
URL lists for spam filtering that block messages containing specific URLs within their message body. EOP includes additional lists beyond those available in FOPE.
The ability to skip spam filtering for trusted senders, based on subscription lists
The ability to filter messages written in specific languages, or sent from specific countries or regions
Malware filtering that can delete and strip unsafe attachments
The capacity to mark bulk email (such as advertisements) as spam through the user interface
The capability to search for, view, or release quarantined email messages in the EAC
Transport rules which you can use to control mail flow, based on a message’s content
Message tracing capability, which allows you to search for and view details about a specific message
Inbound connectors and outbound connectors you can use to enforce secure communication between you and a partner, or to make hybrid mail flow (where you host a portion of your mailboxes on-premises and a portion in the cloud) possible
New reports, which you can use to monitor your organization’s mail flow, available in the Office 365 portal, by using a Microsoft Excel download application, or by using a Web service.
Below screen shows you that how the mails are getting scanned by Exchange online Protection(EOP).

EOP standalone Where EOP protects your on-premises mailboxes.
EOP features in Exchange Online Where EOP protects your Exchange Online cloud-hosted mailboxes.
Exchange Enterprise CAL with Services Where EOP protects your on-premises mailboxes, like EOP standalone, and includes data loss prevention (DLP) and reporting using web services.
Now we will see how to transition on-premises SMTP Mail relay to Office 365 EOP. Consider you have Exchange on- premise servers and On-Premise SMTP Engine(Example,Symantec data-loss-prevention) which is receiving emails on behalf of your Domain which is ideally placed for mail scanning and working without any issues.
Before we are starting the transition we need to have below pieces handy
Office 365 Tenant level permissions and Exchange online permissions
Exchange On-premises Level Admin rights.
Keep current Mail flow architecture
Ensure you have access to your public DNS to perform DNS Changes.
Keep all your IP Addresses are which is being used for current mail flow and ensure the IP Addresses configured properly.
We are going to perform below steps,
Add the Domain in Office 365 Tenant.
Create Send / Receive Connectors in Exchange online: which is required to relay mails to on-premise exchange servers and receive emails from on-premises
Change the MX records in Public DNS
Create Send Connectors in Exchange On-premises servers: which is required to send mails to office 365. it is required if you planning to use EOP for Outbound Services.
Step 1: Add the Domain in Office 365 Tenant
Login in to Portal—Domain–Click on Add domain

Click on Let’s Get Started

Type the domain name and click on Next


You can use two ways here to verify the domain,
Office 365 will automatically try to Identify the DNS Provider. Domain will be automatically verified post authentication. No need to do anything in the method
Manually login in to DNS Management console and add the TXT record.
I am going to so you how to verify the domain by manually creating the TXT record.
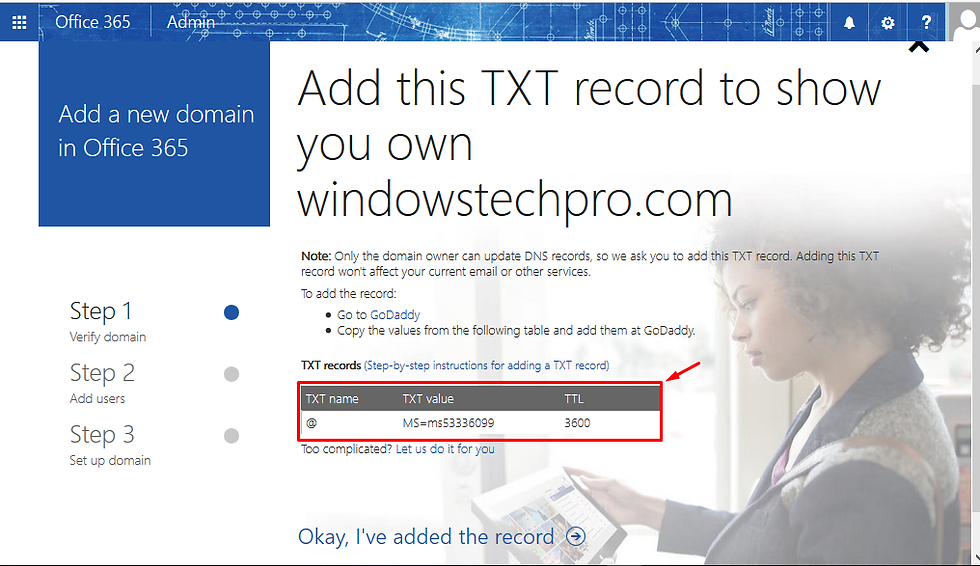
Click on use a TXT record to verify you own this domain.

We need to add the below record in the DNS management

Login in to DNS Provider management page and click on Add Record

Select TXT(Text)


Validate the TXT record and ensure it is replicated

Click on Okay, I have added the record

Great. Domain is verified successfully. Click on Next

We are not going to modify any existing users here since we are going to relay mails to onprem exchange servers. Click on Skip this step

Click on Skip this step for now

Click on Next

Select No and click on Next

Do not select any of the options as we are not modifying any existing Exchange Services as of now, Click on Next

Click on Finish

You can see the Domain Setup is completed successfully

Click Domain Settings and to verify the domain settings

Now, Go exchange Admin Center in Office 365 and under Mail flow–Accepted domains–Edit the Windowstechpro.com which we added.

Ensure that internal relay is selected. You also can select if you want to access mail for all the subdomains. Bu default it is not selected.
Step 2: Create Send / Receive Connectors in Exchange online:
Now we need to create connectors in Exchange online to relay(outbound Connector) mails to on-premises Exchange servers and receive mails from the On-premises Exchange Servers
Adding Outbound Connector: Click on Add under Connectors

Select From: Office 365 and To: your Organization’s email server and Click on Next


Select the domain

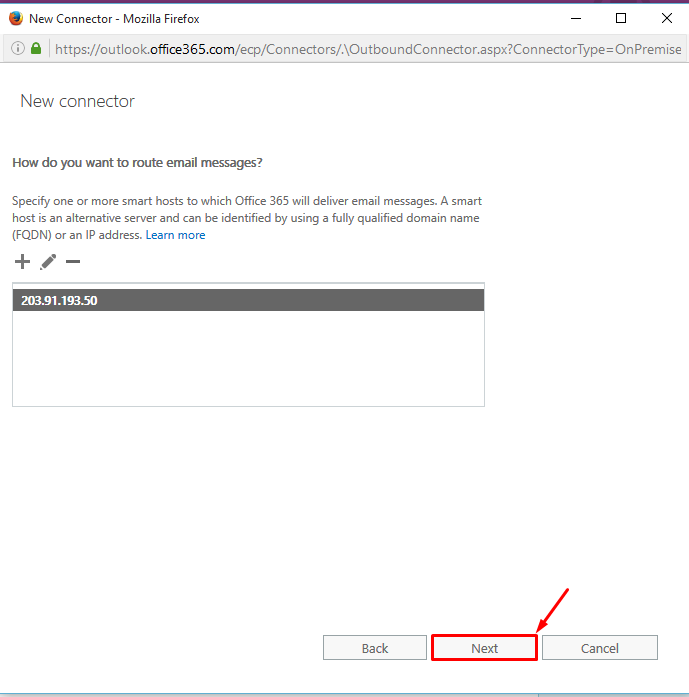
Add the Smart host


Select the TLS which will enable best protection for the mail relay

Click on Next

You can validate the connector by providing the On-premises mailbox address. It will help to validate the mail flow is working fine as expected.

You will receive an email if the connector is successfully configured

Creating Inbound connector: Select From: your Organization’s email server and To: Office 365


There are two options to validate/identify the email is coming from the right servers.
Certificate based validation will enable to validate the certificate before it is received and another one is to explicitly mentioning the IP Addresses of the sender servers.
Herewith I have explicitly defined the edge server IP address which is sending mails to exchange online


Step 3: Change the MX records in Public DNS
Now we are good to change the MX records which are currently pointed to on-premises Server to Exchange online protection.
Login office365 Admin portal and click on domain settings of the domain which you planned to transition to EOP under domains

Click on Change domain purpose

Select Outlook on the web for email calendar and contacts and Click on Next

Need to create the MX record as requested below

If your DNS provider is identified by office 365, you can click on Add records which will enable to add the records automatically whatever required for Exchange online. Other option is to add the records manually by logging in to the DNS provider Console.
In this article, We are focusing only on the Mail flow transition and not required any other changes. Hence I have selected manually adding the MX records by logging in to my DNS Provider .

Click on Okay once added the DNS record in Public DNS

Step 4: Create Send Connectors in Exchange On-premises servers
Login in to Exchange admin center–Click on add under Sender Connectors


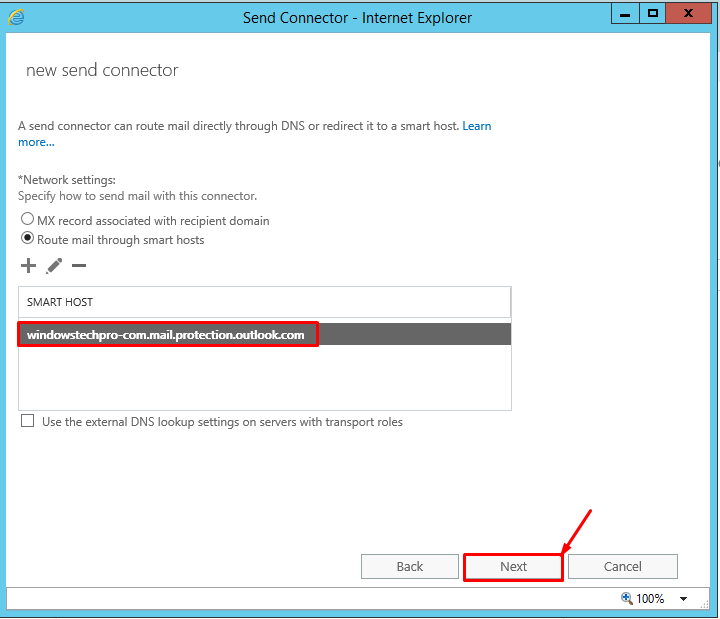
Here need to mention Smart Host as your EOP FQDN: windowstechpro-com.mail.protection.outlook.com

Click on Next

Select on None and click on Next

Since planned to use EOP for all Outbound mails, Added * as domain so that all the mails to external will be relayed through Exchange online protection. If you want to use on-premises outbound Smart host for ourbound mails you may need to modify based on the requirements.

Select the EDGE Servers which you’re going to use to relay mails to EOP and click on Finish.

How simple it is..Isn’t it..?? . Please do test it in test environment before implementing in production.


Comments